NearlyFreeSpeech (NFS) is a bare bones service provider for people who know what they are doing. This makes it a bit more involved in setting up things which other hosting providers may make a bit more straightforward.
I’ll walk you through the process of getting WordPress working on a NearlyFreeSpeech hosted site over the next couple of posts. This post will get your NFS database set up. The second post will get WordPress installed. And the third post will show you how to turn on HTTPS/SSL.
IMPORTANT! If you have TLS/HTTPS set up on your website (from my guide here), don’t have an .htaccess file in place which forces a redirect to HTTPS when you are trying to install WordPress. Wait until you have your WordPress installation working with HTTPS before you put this .htaccess file in place.
Create a mySQL Database
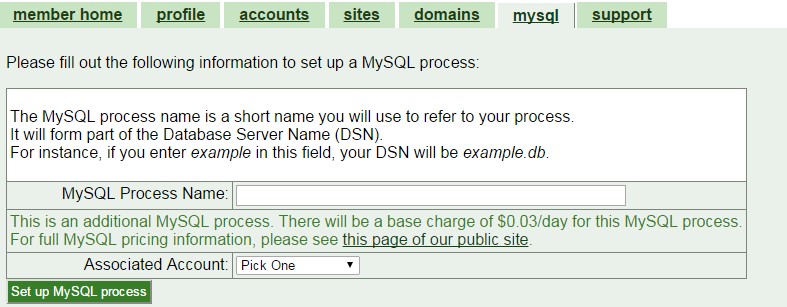
To install WordPress you’ll first need a database. Go to the ‘mysql’ tab in NFS and click on ‘Create …’ on the right hand side.
Throughout this guide you’ll see blanked out info in my pics as I already have a DB and users etc set up for a different project and I don’t want to reveal anything potentially sensitive.
Note that this SQL process can be shared across all your NFS sites and domains so if you intend to have more than one WordPress site hosted in NFS then you can use the same process to host all of your WordPress databases.
Give it a name (referred to as db_host – we only need it once more in this guide when configuring the WordPress installation) and pick an NFS account to associate it with:
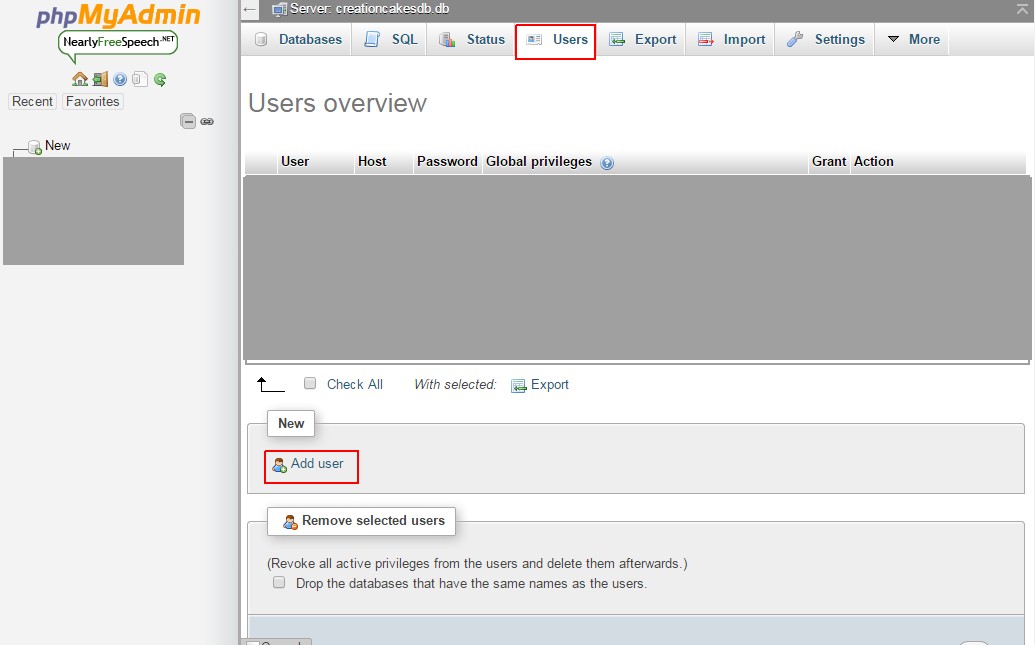
It’ll take a few min for NFS to do its thing and set the DB up. You can connect to it by returning to the MySQL tab and selecting ‘Open phpMyAdmin’ from the right.
Enter your database name that you just selected for the Server. Use your NFS username and your NFS password.

- Click on the “Users” tab.
- Click “Add user.” (It’s toward the bottom left of the page.) (e.g. wp_blog)
- Give the user a descriptive name.
- Make sure to leave the Host: selectbox on “Any host.”
- Click the “Generate” link to generate a nice strong password. Use cut and paste to copy the new password somewhere, you’ll need it later.
- Also select ‘Create database with same name’ (e.g. wp_blog).
- Grant the following permissions to the new user:
- All the permissions except “file” in the “data” box,
- Everything in the “structure” box, and
- “LOCK TABLES” in the “administration” box.
- Click the “Go” button in the lower right.
- Exit phpMyAdmin.
Then click ‘Go’.
That’s the DB all set up. You’ll need the DB name (wp_blog), username (wp_blog), and password (really strong password you made up or generated) again when you configure WordPress in the next post.